Driver Installation in Window ADB and FastBoot on Nexus 4

Driver Installation in Window ADB and FastBoot on Nexus 4
Driver Installation in Window ADB and FastBoot on Nexus 4
Hi Friends,
Here we learn how to install the driver ADB and Fastboot on Windows on Nexus 4:-
The installation of Window ADB and FastBoot on Nexus 4 is very simple and easy..But please be careful what you do because some operations may damage your beautiful Nexus 4..
In all over world The mai problem is over whelming majority of people who come for the first time to the fantastic practice of modding on the Android OS. they know/or Dont know how to install the drivers in Window ADB and FastBoot on Nexus 4.
But we explain briefly what are and what are these drivers:
The driver (windows PC or Laptop) ADB allow you to launch a series of commands from your computer to our terminals.
The difference between driver FastBoot and ADB is, the drive fastboot Window ADB and FastBoot on Nexus 4 are the equivalents of driver ADB.And the only difference that are used when our devices are in bootloader mode.
>>Here am going to introduce <<
How to install the drivers in Window ADB and FastBoot on Nexus 4:(Let’s see)
>>Firstly login with administrator privileges, and download a program for USBViewer Software (32 bit , 64 bit ) that allows us to view all the USB drivers Who is installed on your computer. We select all drivers (Cona VendorID=18d1) and click on the button with the trash can at the top left.(Installation of Window ADB ADB and FastBoot on Nexus 4)
>>We enable USB debugging on the Nexus 4 in Settings >> Options Developer:-
>>Now We can connect our terminal to the computer via the USB cable.after that the drivers installation run automatically. Windows will install the phone as a mass storage device but can not find the driver ADB and so we have to operate manually .
>>After the mass storage option, We download and install the Nexus 4 Toolkit from here and the update to Android 4.2.2 from this link that will be attached to the folder where we installed the Toolkit.
>>Come on Device Manager (right click on Computer >> Properties >> Advanced System Settings >> Hardware >> Device Manager) and note that we have a voice Nexus 4 with a yellow triangle.
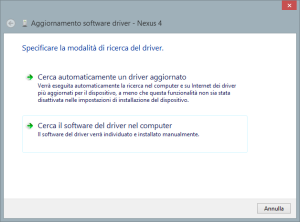
>>After these process click the right mouse button on Nexus 4 and then on Update Driver Software. Then click on search button on drivers on your computer.

>>Now We select the main path where you have installed the Toolkit software and the driver folder. after that click to next button.
If you get a window that says that it is impossible to verify the publisher of this driver, click anyway on Install this driver software anyway.
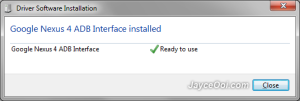
>>And finally, the driver will be properly installed in our computer.

>>At this point we just restart your phone and enter playback bootloade are to automatically install the drivers Fastboot.(Window ADB ADB and FastBoot on Nexus 4)To verify the correct operation of ADB you can just open the Toolkit and on the top of the screen if you see the serial number of the device is then configured properly and you can proceed to change your terminal.
>>If you have any problems or concerns or suggestions, please write in the comments and we will answer you in less than no time at all.<<
- fastboot on nexus 4
- featured
- nexus 4
- nexus window installation
- nexus4usbdrive
- Window ADB ADB and FastBoot on Nexus 4
- Window ADB and FastBoot on Nexus 4

Best Apps to Have on your Phone - Both iOS and Android

Real Estate Social Media Post Design

Incoming Harvard College Students Admissions Essay Goes Viral On Tiktok

Essay Writing Service You Presumably Can Trust

Expert Installation: Tips for Choosing Air Conditioning in Brisbane

How to Maintain a Rotary Vane Air Compressor

Pet Hospital Logo Design Samples


